Showing posts with label Oliver and S. Show all posts

Thursday, October 31, 2013

Playtime Dress with Oliver + S

[sew].

Hi there.

It's playtime.

Which means, it's sewing time.


Which also means, my little almost-three-year-old got a new dress - the Playtime Dress (and tunic) by Oliver + S, in cozy dozy flannel. She loves it!!


A few details? Earlier this week I saw Janice's version on Instagram, its just lovely and got me going. Because the pattern looks like its a wider and shorter design, she cut hers a size smaller and added length. I followed suit - normally I would sew a size 3 but I cut a 2 instead, yet kept the size 3 length. The fit is spot on, but I feel a bit more room would allow for a little growth. Even so, you can see the sleeve does have a dropped look, its way off the shoulder line. 

I made the sleeves 3/4 length and added a flounce in red flannel. I added flat piping around the chest, and a contrast hem band on the bottom.  I admit I couldn't help but think this would also make into cozy pajamas. Ditch the flounce, make it floor-length, maybe a ruffle on the bottom ... I think it can work.


I used a pattern I already own for the flounce, which is essentially a circle skirt for the sleeve. As for the flat piping, I cut  1 3/4"  bias strips, sewn together to make a long strip, then folded in half wrong sides together, pressed and basted to the bodice, raw edges even, before attaching the skirt with 1/2" seam allowance as per pattern. 


For the contrast band at the bottom, I used the difference between the pattern's tunic cutting line and dress cutting line as a guide. I cut two pieces of contrast flannel the exact width of the skirt pattern piece but double the length (because you will fold it in half and not actually "hem" anything), PLUS 1" seam allowance.   I joined these two panels at the side seams to make a tube, then folded in half wrong sides together, raw edges even. Once the skirt was attached to the bodice, I attached the band to the skirt bottom in one fell swoop, right sides together and matching side seams, using 1/2" seam allowance. I topstitched about an inch from the bottom of the band to give the hem a little weight and structure.


If desired, the pattern gives instructions to topstitch a faux collar which extends down the back. I used a triple-topstitch in red, but basted the outline first to make sure I liked it. Its not QUITE as precise as I'd like but, oh well :). 


And finally, I didn't bother with pockets, though I will definitely add them for my bigger girlies who will totally appreciate this detail. But I figured Katie won't know the difference.


This is a popular pattern right now in blogland especially because its a new release, so you will find a LOT of inspiration online! It was very sweet and quick to sew together with lovely details. My next one will be a tunic for sure. 

Oh, one more thing, if by chance you are sewing a size 2, make SURE to check your back facing pattern piece. There was a size error in the first printing of the paper pattern (so if you were eager and ordered the pattern as soon as it was released, you may have received the incorrect piece) which has since been fixed. You can print the correct piece under errata for this pattern, on the Oliver+S website. 

I think I'm ready to tackle the other new Oliver+S release, the Library Dress. That is, unless I get side-tracked with making Christmas gifts - mugrugs, aprons, curvy-clutches and other lovelies ... not too long till Christmas you know ... time to prepare :).

OK onto reading. 
Nothing to report. Must make more effort next week.  

Alrighty then.
I'll be back later to link up with Elizabeth when she posts her needle and thREAD.

Until then, its playtime my dear sewing friends!

And here is the link to Elizabeth's needle and thREAD! Enjoy!


Thursday, August 08, 2013

Oliver and S Roller Skate Dress with Contrast Eyelet Lower Band

[sew].


A little guided tour?

Well, for starters, I adore the curve of the little cap sleeves and the V-cut-out neckline: 


Three pearl buttons with loop closures (opposed to one as per pattern). Inspired by Charise's version here. In fact, much of this dress was inspired by hers - the yellow fabric, the contrast waistband.  

I lined the dress with a very light-weight muslin, but wanted this yellow to show through the eyelet, so I added it as a contrast piece to the muslin lining, using the tunic cutting-line as a guide, sewn with the right side of the fabric facing outwards.

For the eyelet band, I wanted to be able to use the selvage edge as the hem - which in the case of eyelet - is a lovely scallop. However, the dress has a curved hem (A-line). This would pose problems with matching up the eyelet scallops properly and affect the hang/hem in general, especially at the side seams. So I straightened the hemline first by chopping 6" off the bottom, straight across, of both the front and back pattern pieces. While I was doing this, I consulted the Oliver + S Forums to bounce ideas and had replies and advise within a few minutes! Thanks you guys!!

Here's a photo tutorial of how I attached the band. I cut the band 6" wide; and about 4" longer than needed to go around the hem. I finished the raw edges of the eyelet and the dress with the serger first - since eyelet is bulky it was easier to do this now rather than after the seam was sewn. Then, pin eyelet, RST, to bottom of dress. Start and finish sewing about 2" from the centre-back seam. Like this:


Keep your dress free and sew the centre-back of the eyelet, like this:


Finish the raw edges and press the seam open:

Then head back to your machine and finish attaching the eyelet, matching up your seams.

I pressed everything up toward the dress, to avoid seeing the eyelet seam-allowance. Whew, that part's done!


For a contrast waistband, I cut 1 1/2" bias strips and folded the raw edges under 1/4". Actually, I did this with a bias-tape maker and it worked really well. Fast. I wanted to make sure to piece my bias strips at the side seams - that meant two bias strips. I applied it much the same way as the eyelet band to  make sure the side seams lined up perfectly.  I carefully pinned the top edge and sewed it first. Then I sewed along the lower edge, leaving an opening to insert the elastic. I inserted the elastic in between the lining and the outer fabric, then top-stitched the opening closed.


And, I'm outa here, she says.

She loves her dress. Sigh, and so do I. I think this is one of my very favorite Oliver+S patterns to date. This was also the pattern used in SewMamaSew's Super Online Sewing Match for Round 2, so make sure to check out all the pretty rockin-Roller Skate inspiration.

And finally, to wrap things up, I'm happy to report I finished reading Pride and Prejudice and let me tell you, it has a JUICY ending. Ah, love. I mean, you see it all coming of course, but its just wonderful to savour each and every word of the page. Now I need to get my hands on the movie. And start another Jane Austen. Which one? I've already read Emma, Persuasion, and Mansfield Park. Suggestions for the next?

I'll link up with Elizabeth if she posts a needle and thREAD today. Till then, dear sewing partners-in-crime, may God bless all your stitchin'.

xo

Thursday, August 01, 2013

Class Picnic Shorts - Oliver + S

[sew].

Dilemma:
Lemon yellow 6oz stretch denim that was supposed to arrive from Fabric.com as a lovely mustard colour to make myself another pair of jeans. This is a problem when you order fabric, you takes your chances, sewing girl. I have always had good luck ordering online, aside from the time they sent me yards and yards of flower fairy fabric that I didn't exactly order. But they always make amends, so that's good. Still, its a bit of a crapshoot, this business. But when life hands you lemons ... (c'mon, I couldn't resist).

Solution:
Class Picnic Shorts by Oliver + S.  Oh yes. No? Yes. YES. They have been on my summer bucket sewing list since last year. I shouldn't have waited, because they are awesome! Two pairs to share today, one as written and one with ruffles.


Please excuse the tucked-in shirt! She was obsessed with "seeing" the birdies in all their glory! These shorts are really sweet and not difficult to make. Just a few finicky parts. And I'll tell you about them in case you need a heads-up before you sew your own.


Maria, age 4, is wearing the size 5 and they are plenty roomy. My sewing suggestions? 

One. Interface both the front waistband and the front waistband facing instead of just the facing. It gives the shorts more structure in this area, especially if you are using quilting cotton for the shorts. This was a great tip from Gail, who, by the way, has made a couple of really cute versions of these shorts.

Two. Be VERY precise when overlapping and sewing the contrast facings (the birdies). If you're out a little bit, the front waistband will be either slightly too big or too small. In my case, the front waistband was just a tad too big. If this happens to you, when you attach the waistband to the shorts, sew with the waistband on the bottom of the waistband/shorts layer, next to the feed dogs, and your feed dogs will ease up that extra centimeter or two (this works even with a walking foot I find). You can stretch the top layer slightly as you sew as well. I also find it helpful to sew from the centre-front outwards to the centre-back, then repeat going the other direction. 

Three. Allow some extra elastic in the waistband so the shorts can carry through the next season. Even better, consider using buttonhole elastic - there are instructions in the pattern for doing this. The shorts are quite roomy in the waist, so its worth it to do so. Here's a look at the back:


I didn't have any buttonhole elastic though, so I added an extra couple inches of elastic on the end and tacked it for next year. I'll show you what I did, but on rethinking my method, its wrong. This is the WRONG way to do it, even though it will do the trick:


What I should have done was sew the end down permanently, but still use enough elastic to add the fold of elastic on the other side of where its attached, then tuck the whole thing inside the casing. So all you'd have to do was unpick where you sewed the fold of elastic. The way I've done it, I will have to unstitch where I sewed it down to the waistband, unstitch the fold of elastic, AND restitch down for the new length of elastic. Oh well, thought you might as well learn from my mistake :). Or, maybe just buy the darn buttonhole elastic and be done with it.

Now, let me share Alexa's version of the shorts. Ruffles!

Class Picnic Shorts modified to add Ruffles.
This version was fun and quite easy! Easier than the contrast facing I think. I saw these on Pinterest, of course, which led me to this tutorial for adding the ruffles.


 Alexa, age 7, is wearing the size 7 and these are also plenty roomy - she is a tall and solid girl for her age and they still have lots of ease. I am pleased with the length. 

I followed the tutorial pretty much exactly but a few tips here too. First, the tutorial is written for a size 5, so when she tells you to topstitch down 4 inches when overlapping, well, you want to go a little longer for a size 7. I also had some fiddling to do when placing the overlap since I cut my ruffle strips 1 1/2" instead of 1 1/4".  I wanted my ruffles to have a bit more depth. But keep in mind the overlap will dictate the length of the front waistband, so again my waistband was a smidge too big and I had to do some creative stretching. All turned out good though! And most importantly, she LOVES them.


I used my ruffler foot which is really more like a pleater. I rarely use this foot, so I'm not sure I'd recommend it, but boy it sure is slick when I do. And fast. I finished the ruffle raw edge with a rolled hem on the serger - that I definitely do use a LOT.

And a peek at the inside waistband using contrast fabric. Its Amy Butler.  In case you were wondering.


Hey if you're interested, I noticed that Suzanne for Whimsical Fabric is doing a sew-along on the shorts and blouse right at this very moment! They are releasing lesson 2 today! So check it out! 

Alrighty then, onto reading.

I am happy to report that I am officially out of my reading rut. While away camping on the weekend, I was able to get my head into a good book, that good book being Pride and Prejudice by Jane Austen, on my handy dandy kindle. I last read this in grade 7, and was not cultured for classics then. I am now, and this book is sooo fabulous. I'm at the part where Eliza is visiting Charlotte and Mr. Collins. I'm so interested to find out if she and Mr. Darcy will marry ... don't TELL me ... I'm savouring every minute. 

How about you? What are you up to? Summer is a-passing quickly. Fall wardrobe ideas? Reading list? Please share! Linking up with Elizabeth who hosts needle and thREAD, so make sure to pop over there to see what others are sewing and reading.

God bless all your sewing and reading endeavours!


Thursday, February 21, 2013

Oliver and S Family Reunion Dress - Let's Add Pockets with needle and thREAD


Good morning sewing friends!  Hi to those of you linking up from Elizabeth's!  What's sewing your way?

Over here, its round two of the Oliver + S Family Reunion Dress (you can see round one, the blouse version, here!). This week, the dress.  Modeled by Alexa (6), in Maria's size 5 dress. But you can see it fits her, albeit a bit short and she said it is cutting into her arms. Maria was already in bed but it fits her perfectly; a size bigger than her age, my general rule of thumb.

Thursday, February 14, 2013

Oliver and S Family Reunion Dress - the Blouse Edition


Happy Valentine's Day ... and Second Day of Lent .... this is going to be a sewing quickie. Yup. 

May I introduce to you Kate's new Oliver and S Family Reunion Dress - in the blouse version?


Kate turned two before Christmas, I made this in a size 3. Its definitely roomy but I like it that way. Room to grow. The neck is not too gaping so that's good.  The pattern is straightforward enough, but take your time. Its not an instant sew. I found an old sew-along at Lola Pink Fabrics blog  that I referred to, but it was really a reprint of the pattern instructions more than anything else. Still, good visuals and nice to go through with them step by step.

Thursday, July 19, 2012

Oliver and S Class Picnic Blouse


This week, sewing along with Elizabeth (do check it out), I have ventured further into the world of Oliver and S.  And believe me, it is a world unto itself - there are huge flickr pools with over 15,000 photos, and blog sew-alongs, as well as the forums over at Oliver and S itself, with a dedicated forum for each individual pattern! Um, wow, that is way cool. So my first tip is, before you start any Oliver and S pattern google it and check out all the extra resources you can. You will find the experience of others to be plentiful and invaluable. For example, last week I made the reversible bucket hat (free pattern on their website), but since then I found a blogger who shows how to make the hat without any hand-sewing! - very clever and more speedy!

My girlfriends and I had a little sewing retreat this past Friday night. Yup, we stayed up past midnight, had plenty of salty and sweet (crackers, dip, brownies), and just sew sew sew and yak yak yak.  We started in the late afternoon with kids underfoot, then later our hubbies took over the childcare and we really got down to business! This week, I made the totally cute Class Picnic Blouse by Oliver and S.


Check it out:

Raglan sleeves, 3/4 length, elastic at the shoulder. If you sew this blouse, I highly recommend taking a look at this tutorial clearly showing how to apply the bias strips which encase the elastic.  Its not hard, but its always nice to have a visual before doing it yourself :)

Yoke with light gathering on bodice. I have seen versions on flickr with piping across this chest seam. Next time!

This is a size 6. Added 1 1/2" to bottom hem, and I could have added more! I also think this would show nice with a ruffle on the bottom edge, not too deep, like maybe an inch. Or, you can turn this into a dress by lengthening the top and adding a deep ruffle - its featured on the Oliver and S blog.

The back mirrors the front, but with a deeper yoke at the back. Next time, I'll add a little piece of ribbon inside to show Alexa which side goes in the back. Like a tag.

I added a ribbon trim around the bottom of Maria's. Maria's is a size 5, only one size down from Alexa but there is a big jump in the size! I added an extra 1 1/2" to the bottom of her hem as well.  I think this blouse in a baby size is even sweeter and would like one for Kate who is 18mo - but that means purchasing another copy of the pattern in the baby sizes. I think I might be able to guesstimate it from Maria's though.

I really enjoyed this pattern. I envision making this in fall fabric, even in a very lightweight corduroy. Goes great with shorts, goes great with leggings as well if you add length to the hem.  If deciding between a bigger or smaller size, go bigger for this pattern. It isn't THAT roomy for the size.  For example, Maria is an average 3yo, but she is wearing the size 5 and it just so fits. 


Next up for sewing - I've cut out more of the reversible bucket hat with some pattern adjustments, and I'd like to make the shorts that go with this picnic blouse. It will depend upon my mood, and the weather :)

And onto the reading!
We are still plugging away (there's no rush) at reading aloud James Steyer's Talking Back to Facebook. So so good. 

The other read this week is something I came across in my travels at the Kindle store - written by one of my heroes, Cardinal Timothy Dolan, True Freedom: On Protecting Human Dignity and Religious Liberty:


At just over $1, its a treasure to add to your handy dandy kindle!!! The book is really an essay, something you can read in a short sitting, but it has so many words of wisdom and truth that it brought me to tears. Here is a little excerpt:

"... law's most noble purpose is to safeguard the "being" of life from the rawest preferences for "having" and "doing." Take, for example, the fact of the "being" of the baby in the womb. That "being," that life, trumps the values of usefulness, efficiency, convenience, privacy, or satisfaction of one's needs. A culture of life with supportive laws guarantees this."

"For many couples, babies are now postponed by chemicals and latex, until a couple might decide they'd enjoy one and then are irritated when they can't conceive, driving them to laboratories where perhaps technology can make up for what only nature does perfectly. I know that this does not apply to all infertile couples."

"Still, for many, its another example of what I want, when I want, because I want."

"Many people have babies, if at all, to satisfy their own desires, not to sacrifice for the child's; to fulfill their own needs, not because they long to spend the rest of their lives fulfilling their children's needs; to reward themselves, not because they want to shower love upon their kids.  To this culture of death, the Church boldly and joyfully promotes the culture of life."

Them's powerful words, huh?!!
My dear friend downloaded this book as well and we are planning a little book discussion! Writing and speaking crystallizes thinking :).

Have a great weekend, and thanks for stopping by!


Thursday, July 12, 2012

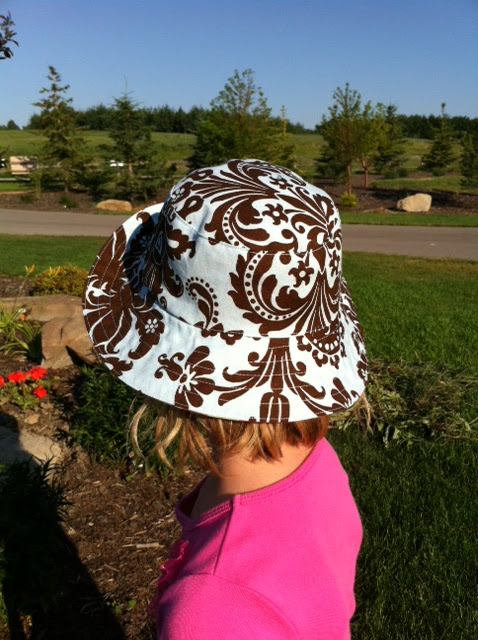
Reversible bucket hat from Oliver and S

Crafting along with Elizabeth this morning at needle and thREAD.

So, summer has finally hit in full force and the weather is hot hot hot!  Its time for hats! This week I decided to try a hat, using the free hat pattern over at Oliver and S.  Elizabeth has sewn several girls patterns by Oliver and S which inspired me to check out their website, and I love free patterns!


The hat is reversible. Love that. One hat, two looks. This is the size for age 6-8; my daughter just turned 6.  

The patterns suggests doing several rows of topstitching to give the brim more stability and I really like that effect. It also calls for sew-in interfacing for the brim - I didn't have any so I used drapery lining - this is a stiffer lining and it worked wonderfully.  Don't be afraid to improvise - it just needs something to stiffen the layers.  If you only had lightweight interfacing, I would use two layers. Or, just use an extra layer of fabric. Improvise!

The hat is relatively easy to sew. There are 3 pieces - the crown, the side, and the brim - for each of the two fabrics. Take your time going around the curves.  When it says to clip, clip in as deep as you can without going into the seamline. The pattern instructions are clear and easy to follow.  You could add some funky details too, if you like, such as a pocket or patch. 

The hat also fits my 3 yr old. However, when I make it again for the other girls, I'm going to widen the brim and deepen the side for a better fit.  Neither girls feel the hat really fits them well, even though it looks fine here.  It would blow off in a second if there was a little wind.


As for reading, I'm still plugging away with Talking Back to Facebook by James Steyer (Common Sense Media).  We are reading this aloud to the older kids (ages 12 and 14) and having lots of discussion along the way - this book is EXCELLENT - it deserves a post on its own. At this time we have no intention of giving the kids facebook accounts; but I think simply reading and discussing this book is a good start to the process - becoming aware of the issues and pitfalls, etc.  Download this book to your handy dandy kindle!

Enjoy the rest of your week. My sewing girlfriends and I are having another retreat this weekend - join us in spirit??