Showing posts with label Crafts. Show all posts

Thursday, September 20, 2012

Amy Butler Blossom Handbag Tips - needle and thREAD

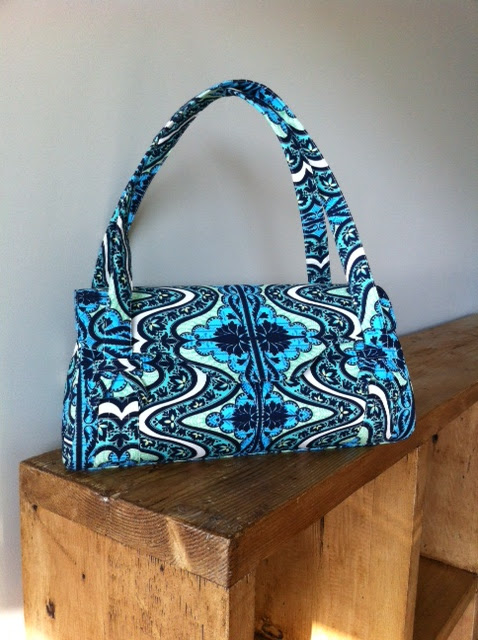
Good morning! Its Thursday again, and time to join Elizabeth for her weekly Needle and thREAD sew and read-along.  May I introduce to you the Blossom Handbag by Amy Butler?

Careful, put on your shades.  The fabric is pretty funkalicious! I'm still not sure how I feel about it ...

Of course the really exciting part is I'm getting ready for Sewing Summit in just a few short weeks!  Ahhhh! And if you follow the "Travel Handmade" threads on bloggerland, you'll find that most attendees are busy sewing something useful for the journey. I have had some Amy Butler Lark fabric hanging around that I've been dying to use. I was saving it for the Weekender Bag, but won't get around to that in the very near future. So I decided to try out Amy's Blossom Handbag, a free pattern online.

Pretty darn roomy inside! I'm thinking a great little sewing bag for the conference. Can stash my scissors, thread, unstitcher and other unmentionables ... and maybe a little knitting project for the road as well!

The pattern itself is a JOY to construct. Honestly, it was not difficult, just take your time. It does help to have some experience.  I searched online for tips before diving in, and there were only a few.  I'd like to share a few more here, in case you are inspired to whip one up for yourself :).  Can't beat an Amy Butler freebie ...

Here are some things to note:
- you CAN use quilting cotton, as I have, even though the pattern calls for a heavier-weight home-dec fabric. The only thing I would suggest is to ALSO apply fusible interfacing to your lining pieces, not just your exterior pieces as per instructions.

- think hard about fabric placement. My main fabric "motif" runs exactly down the middle of the bag. The yardage requirements are VERY generous, so you should be ok, just plan where you lay your pattern piece

- one of the first things you do is attach a magnetic snap. Use a little piece of Pellon to stabilize it. I also placed my snaps about 1/2" higher than pattern, based on tips online. Glad I did.

- don't bother with Pellon in the side flaps. Use a softer fusible fleece instead. I saw too many complaints online about difficulty sewing bartacks through all the Pellon layers in the side flaps. Substituting fleece makes the sewing easier and the product is still very strong and stable.

- and about those side flaps, that came up as one of the "difficulties" of the bag, because you are sewing curved side flaps to a straight edge.  Here's what I did, in picture form.

This is a side flap (lining piece). Mark the bottom center with a pin.

This is the bottom panel, attached to two exterior main panels (lining). Mark the center of the bottom panel with a pin.

Right sides together, pin side flap to straight edge of bottom panel. Poke!

Now pin the side straight edges, matching raw edges at the top. Leave the curve part unpinned.  Just pin all the straight edges. Then over to the machine.

Begin sewing from the CENTER of the bottom panel and head straight into the curve. Stretch and ease the fabric as you go, gently sewing around the bend. Raise and lower the presser foot every few stitches as you sew the curve, if you have to. Sew right up to the top.  Then, turn the piece over and begin back at the bottom center again, sewing around the other curve and up the side. Voila!

Another great tip - when attaching the lining to the exterior, the pattern would have you put right sides together, leave an opening and turn it all right side out.

I say P-shaw. I read online that this turning process caused a lot of crinkling of the pellon (which is hard to smooth out again once crinkled).  I also saw somewhere (I think Patternreview.com?) a tip to do the following, which I thought was brilliant:  Just fold over your raw edges and set the lining directly INSIDE the bag exterior, pin and edgestitch all the way around.  I edgestitched twice, for added strength. Oh yeah. 


Hard Mike (cranberry) bottle in background. Empty. Sometimes it helps ...

The interior divider panels are lined. Which means you have to sew right sides together, but not all the way around. You need to leave room to turn it right side out, about 10" so says the pattern. Anytime you have to leave a space for turning, sew a little notch. It helps hold the fabric folded in place when you go to iron and stitch it down:

Can you see the little blue dot of fabric marker? That's where I start stitching, about a centimeter down to the actual stitching line; pivot and turn and carry on. That's what I mean by a little notch.  


When you attach the interior divider panels to the sides of the bag, there are a LOT of layers going on.  So don't bother with pins.  Use binder clips instead to get you to your machine.


Nice little bartack! Can you see it in white?


And I'm ready for date-night with my husband :)


When I make this bag again, I will opt for the shorter handles (I think it looks nicer) and a softer, more subtle fabric. 

As for reading this week, I've delved into Jane Eyre for a second time.  Its the first book we are discussing over at Classic Moms next week. Gonna be great.

Head over to Elizabeth's to see what everyone else has been up to.  Happy sewing!


Thursday, September 13, 2012

Aprons from Tea Towels/Dishcloth Tutorial - needle and thREAD

Oh what a crazy summer! Crazy and wonderful and while I did lots of sewing I did little blogging about it! So maybe its time to catch up? After a long reprise, I'm joining Elizabeth again, with


Today I'm featuring a tutorial to make an incredibly easy self-adjusting apron from a cotton tea towel! If you have little girls, you will LOVE this not only for baking, but slipping on over their princess costumes which they refuse to take off when they eat.  Kind of a grown-up bib. You won't really mind if they wipe their dirty fingers on it, because, it is a tea towel at heart!

I made several aprons from tea towels as treats for the girls at Alexa's "sweet shop birthday party." I was inspired by this post over at Life is a Party;  tweaked the instructions a bit to make it even easier to sew, and here it is just for you :).

In addition to your regular sewing supplies, you will need:
- any rectangular tea towel. I couldn't resist these floral ones from IKEA.


They are a good size, nice and thick, and inexpensive. Give it a good press and a shot of spray starch :).  Don't worry if it isn't a perfect rectangle.
- ribbon, 1" width works best but you can experiment; you need about a meter
- optional embellishments, such as ric-rac or decorative ruffled ribbon, etc

Step 1: Fold to Make a Casing


Fold the two top corners over to the wrong side (to make a triangle) and press. I've shown a 90 degree angle, but you can make the triangles even more angled to practice your Living math.


I've got about 5" across the top.

It should look like this from the right side:


2. Sew each triangle down, about 1" from each diagonal outer edge. This will form a casing for the ribbon.  If you use ribbon less than 1" wide, make your seam the same width as your ribbon. You don't want to have any extra room, otherwise the ribbon will fall right out due to the weight of the apron.


Sew along this edge. I used a zigzag stitch, that way you don't have to worry about finishing the raw edge. Make sure to backstitch at both ends.

Turn it back over and cut off the excess triangle, close to the stitching. Should look like this:


3. Run the ribbon through the casing.  
Beginning on the lower right side, and using a safety pin attached to the ribbon, pull the ribbon up one side casing then down the other side.

Go up one side ...

And down the other.  This part of the ribbon will go around the neck.

The ribbon becomes the way to adjust the apron. Remember, your casing can't be wider than the ribbon, or the apron will just drop right out. It works best if the casing is a little tight.

4. Embellish, if you wish. Or shorten if needed.
I didn't do any embellishment on my aprons. But I did shorten Maria's by adding some pleats. The aprons are long enough for even me to slip on, and I love that. I also like that these tea towels have a little hook on the top.

And voila! (Sorry about the blurry pic)


Cinderella is protected!


And on to reading. READING!!

 I have been completely captivated by the novels of Immaculee Ilibagiza. She was recently a guest on my favorite radio show, The Catholics Next Door - do check out the link to her interview and other resources.  Immaculee is a survivor of the Rwandan genocide - almost all of her family were brutally murdered - but she was Left to Tell. This story will revive your faith and touch your heart. Neither my husband or I could put it down and it made for some very late night reading! Download it to your handy dandy kindle.

Many blessings and have a wonderful weekend!


Monday, April 23, 2012

Just another manic monday ...

five kids
+
beautiful weather
+
inspiration acted upon

a hand-crafted bow and arrow; 
a refurbished yellow tanktop;
the start of an ant gel colony in the name of living science;
a sweet ruffly skirt with jaunty orange flower; 
five happy kids; and
one happy mom


Saturday, February 25, 2012

Gospel ... and Art on the go


Gospel Lk 5:27-32

Jesus saw a tax collector named Levi sitting at the customs post.
He said to him, "Follow me."
And leaving everything behind, he got up and followed him.
Then Levi gave a great banquet for him in his house,
and a large crowd of tax collectors
and others were at table with them.
The Pharisees and their scribes complained to his disciples, saying,
"Why do you eat and drink with tax collectors and sinners?"
Jesus said to them in reply,
"Those who are healthy do not need a physician, but the sick do.
I have not come to call the righteous to repentance but sinners."

Can you imagine getting up and following some guy just because he says to? I can't. But wow, it must have been completely charismatic to be in the presence of Christ as a man, because Levi did get up and left everything behind.  Everything! Levi (also known as Matthew, the tax collector) threw a big party for Him, and brought all his other tax collector friends, the despised ones. Can you imagine the freedom they all must have felt, because surely those of them who had fallen into corruption would have been moved to repentence and then forgiven by Christ, no?

When I recently attended the Visitation of the Relics of St. Giana, the presenter told that 5000 people came to the church or were outside the church on her wedding day.  He said that she drew such a crowd because people loved to be near her.  It was because she simply exuded Christ, and whether we know it or not, we long for Him.  Sigh.

So its been a really long week with play performances and running here and there and school, I was really in need of some sanity therapy.  Saw these very sweet art-folios from Gingercake Patterns and Design and  it quickly became a project.  The girls were very excited, and Dawson also had to have his own.  I modified his to be a large folio, but the girls' I made directly off the pattern.  Lots of fun stuff at this site.  The folios became quick inspiration to draw and everyone was very busy! We also found out today that they perfectly hold a couple of Bob books.  Bonus!


The kids all picked fabrics from my stash of fat quarters.  If you ever make this, please note that the pattern only gives you the total amount of required fabric for front and back.  You have to guesstimate how much if you want to make the pockets all different colors.


The small folios are meant for crayons, but we found they also fit Pipsqueak markers and mini-gel pens.  Crayons would fit a bit better though :)


For this larger folio, I used Pellon (medium-weight stabilizer) to stiffen it.  The little ones were done with fusible fleece ... but the actual pattern calls for batting.  


These are going to be GREAT for travelling!

Enjoy your day!!

Wednesday, February 08, 2012

A little laundry ...

I'm not sure where I got this idea, online somewhere several years ago now.  I'm sorry I don't have a link and can't credit this.  This is just a fun and easy little activity my girls enjoy.  Since I have to keep Maria out of the kitchen (see previous post), I thought I would divert her energy into the laundry room.

Buy some plastic clothesline and clothespins.  Find a safe place to hang it in your house.  Get some small items like baby washcloths, tea towels, or if you quilt - charm squares!  (You know, those pretty pre-cut squares of coordinated fabric that are nice to get out and pet once in a while!)  Maybe add a cute little wicker basket for the pretend laundry and voila.  Great for imaginative play and fine-motor skills!


Thursday, December 29, 2011

Mommy Creations - Flannel Giftbags

Merry 5th Day of Christmas everyone!

I want to share with you some photos of Christmas with the gift bags.  This first set of photos is from my inspiration mommy who gave me the idea in the first place.


  LOVE the felt tags with initials!


An inside look!


Thanks so much for sharing!!


And a quick peek at our Christmas morning at Grandma's house:


Twas no less exciting with fabric!!


All for now!