![live.faith.homeschool.[sew].](https://blogger.googleusercontent.com/img/b/R29vZ2xl/AVvXsEiqdSm4p3-5HAX1sw-ajErf7HAwX75WrUjAhenjGMyoO18VVxeodwTiqcNRQ7TzV8aNLYcc6Rwcwhq6V57bN6Utzp2DpkL6jQTO1IhHVXzqQPz_5QF8pUxkB1-rs_uiRFBwZiUC5nNbaik6/s1600/blog+header+.jpg)

Good morning sewing friends! Hi to those of you linking up from Elizabeth's! What's sewing your way?
Over here, its round two of the Oliver + S Family Reunion Dress (you can see round one, the blouse version, here!). This week, the dress. Modeled by Alexa (6), in Maria's size 5 dress. But you can see it fits her, albeit a bit short and she said it is cutting into her arms. Maria was already in bed but it fits her perfectly; a size bigger than her age, my general rule of thumb.
The pattern sews up like a dream, though mildly labor-intensive - what with tracing and sewing all those pintucks, installing the neck facing, and other pretty details. But then, I find the Oliver + S patterns best suited to when you want to take time and enjoy the sewing process and give it your best. Forget the shortcuts. Learn beautiful construction methodology along the way instead. No rushing. Pour your sweet little heart right into a garment for your sweetheart. Over a long weekend. Need a few good visuals along the way? Check out a previous sew-along by LolaPink fabrics.

Added pockets to the dress. I liked the contrasting material and I wanted to see more of it.

Covered buttons. Easy peasy. I'll show you how in a minute.

Contrasting hem facing. Love the dots peeking through. Also went for the 6 rows of decorative topstitching, as suggested in the pattern, to give the hem more stability and a little cuteness. Use contrasting thread for this. I think a wide ribbon would be a great alternative to the topstitching as well.

Only dilemma? Whether to use just the 4 buttons and sew the rest of the back opening shut, or to run 5 buttons right down to the bottom. The reason is, I think it might be uncomfy to be sitting on the buttons. Covered buttons are shank-style, not the flat kind. So I'm waiting till Maria wakes up in the morning and I'll get her to try it on and see where we're at.
OK, take a look at how easy it is to cover your own buttons. You buy a button-cover kit; they come in different sizes, buttons included, usually a pack of 5. Here's what you get:

From left to right: button shell, button back (with shank), buttonmaker, and blue pusher. Have your fabric and a marker ready.

Trace and cut a circle about twice the diameter of the button shell.

Center the fabric over the buttonmaker, right side down.

Buttonshell on top, with the bottom facing UP.

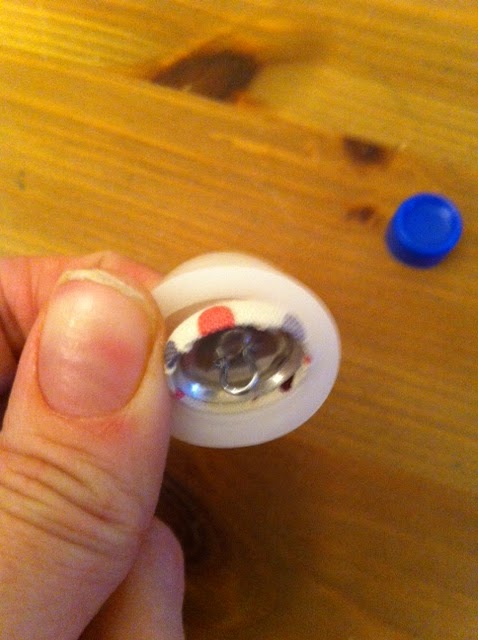
Push it right in with your fingers, tuck the fabric in too. I'm sorry the pictures are fuzzy. I use my phone cause its so easy.

Button back goes on top.

Then the button pusher. Its hollow inside so you can push on it but it won't flatten the shank underneath.

Are you ready for the miracle? PUSH!!!
Then pop it out. Kind of like a baby. But much less painful. And under 2 minutes.

Pretty covered buttons.
There is going to be a round three of this dress, for Alexa. Hers is *almost* all cut out. I would say I'll be getting my money's worth from this pattern!
As for reading - been dabbling in a few things. I'd like to add more spiritual reading to my daily routine especially during Lent. We're doing a family Lenten devotional but I want something for myself. Maybe St. Faustina's diary? Thoughts?
All for today. Have a blessed weekend. And come back to join me each Tuesday during Lent for fasting with friends. Its a journey and we can all help each other along the way!
Haha - I can only assume M did not want to model her dress and A was more than happy!!! LOL - georgeous Michelle - just georgeous! I have a shirt I would LOVE a rub off - next sewing night (that I won't bail on)!
ReplyDeleteLet's work on it!
DeleteThat dress is beautiful. I love the homemade buttons. Your daughter looks absolutely adorable in it.
ReplyDeleteAwww, thank you so much Tina!
Delete