[sew].
This is in progress on the sewing table, a small Christmas wall quilt. Its getting there :). The colors alone revive me.
I still have lots of sewing plans and whether they get accomplished before Christmas or not matters none. Sewing is just a lovely journey in itself and I need the dreams and plans it provides.
As for reading? Its been a busy week. Its show week for three of my kids' Broadway choir group. So the reading has been choppy but I'm still slowly working through Breath of Peace.
What about you? Want to see more? Make sure to check out Elizabeth's needle and thREAD.
Showing posts with label Christmas. Show all posts
Thursday, December 12, 2013
In Progress
Labels:
Christmas,
needle and thread,
quilting,
sewing projects
Monday, January 02, 2012
Nourishment
Ohhhh, I wish you could smell the delicious aroma in my house tonight. I am making the most wonderful stew and mashed potatoes, courtesy of Rachel Ray and as seen on the Dr.Oz show. Its time-intensive to prepare and I'm making a double batch so we have lots for the freezer. A friend made it for us over the holidays and it was amazing!! The potatoes have parsnips and a little white cheddar cheese in it - wow, parsnips are so fragrant and what a sneaky way to feed them to my children!
Cooking is one of the most important "earthly" things I can do for my family. If they don't eat well, they don't learn well. They don't do anything well! And the key for me is good planning combined with lots of freezer cooking. I make up 3 weeks of meal plans at a time and then when I cook I try to make extra to freeze. I used to do marathon freezer cooking weekends - but I don't have enough time for that anymore :).
Speaking of nourishment, I've been pondering the spiritual nourishment of our family. This truly IS the most important thing my hubby and I can foster, and we are all in need. Christ nourishes, but we must bring them to Christ. They must know Him. And the food He provides? Himself. How's that for a concept for a little one to grasp?
I love our suppertime Scripture memory work. I change it once I feel we all have a really good grasp of the passage. Something new we are incorporating this year is committing more of the Catechism basics to memory, using the method outlined in Memorize the Faith, which I downloaded on my handy-dandy kindle. It looks soooo fun! I'll keep you posted.
This week we are preparing for Epiphany; a banner is hung in our kitchen and we are anticipating a yummy crown cake!
God bless your week!
And try that stew!!
The gravy is made from organic apple cider!
Cooking is one of the most important "earthly" things I can do for my family. If they don't eat well, they don't learn well. They don't do anything well! And the key for me is good planning combined with lots of freezer cooking. I make up 3 weeks of meal plans at a time and then when I cook I try to make extra to freeze. I used to do marathon freezer cooking weekends - but I don't have enough time for that anymore :).
Speaking of nourishment, I've been pondering the spiritual nourishment of our family. This truly IS the most important thing my hubby and I can foster, and we are all in need. Christ nourishes, but we must bring them to Christ. They must know Him. And the food He provides? Himself. How's that for a concept for a little one to grasp?
I love our suppertime Scripture memory work. I change it once I feel we all have a really good grasp of the passage. Something new we are incorporating this year is committing more of the Catechism basics to memory, using the method outlined in Memorize the Faith, which I downloaded on my handy-dandy kindle. It looks soooo fun! I'll keep you posted.
This week we are preparing for Epiphany; a banner is hung in our kitchen and we are anticipating a yummy crown cake!
God bless your week!
And try that stew!!
Thursday, December 29, 2011
Mommy Creations - Flannel Giftbags
Merry 5th Day of Christmas everyone!
I want to share with you some photos of Christmas with the gift bags. This first set of photos is from my inspiration mommy who gave me the idea in the first place.
LOVE the felt tags with initials!
An inside look!
Thanks so much for sharing!!
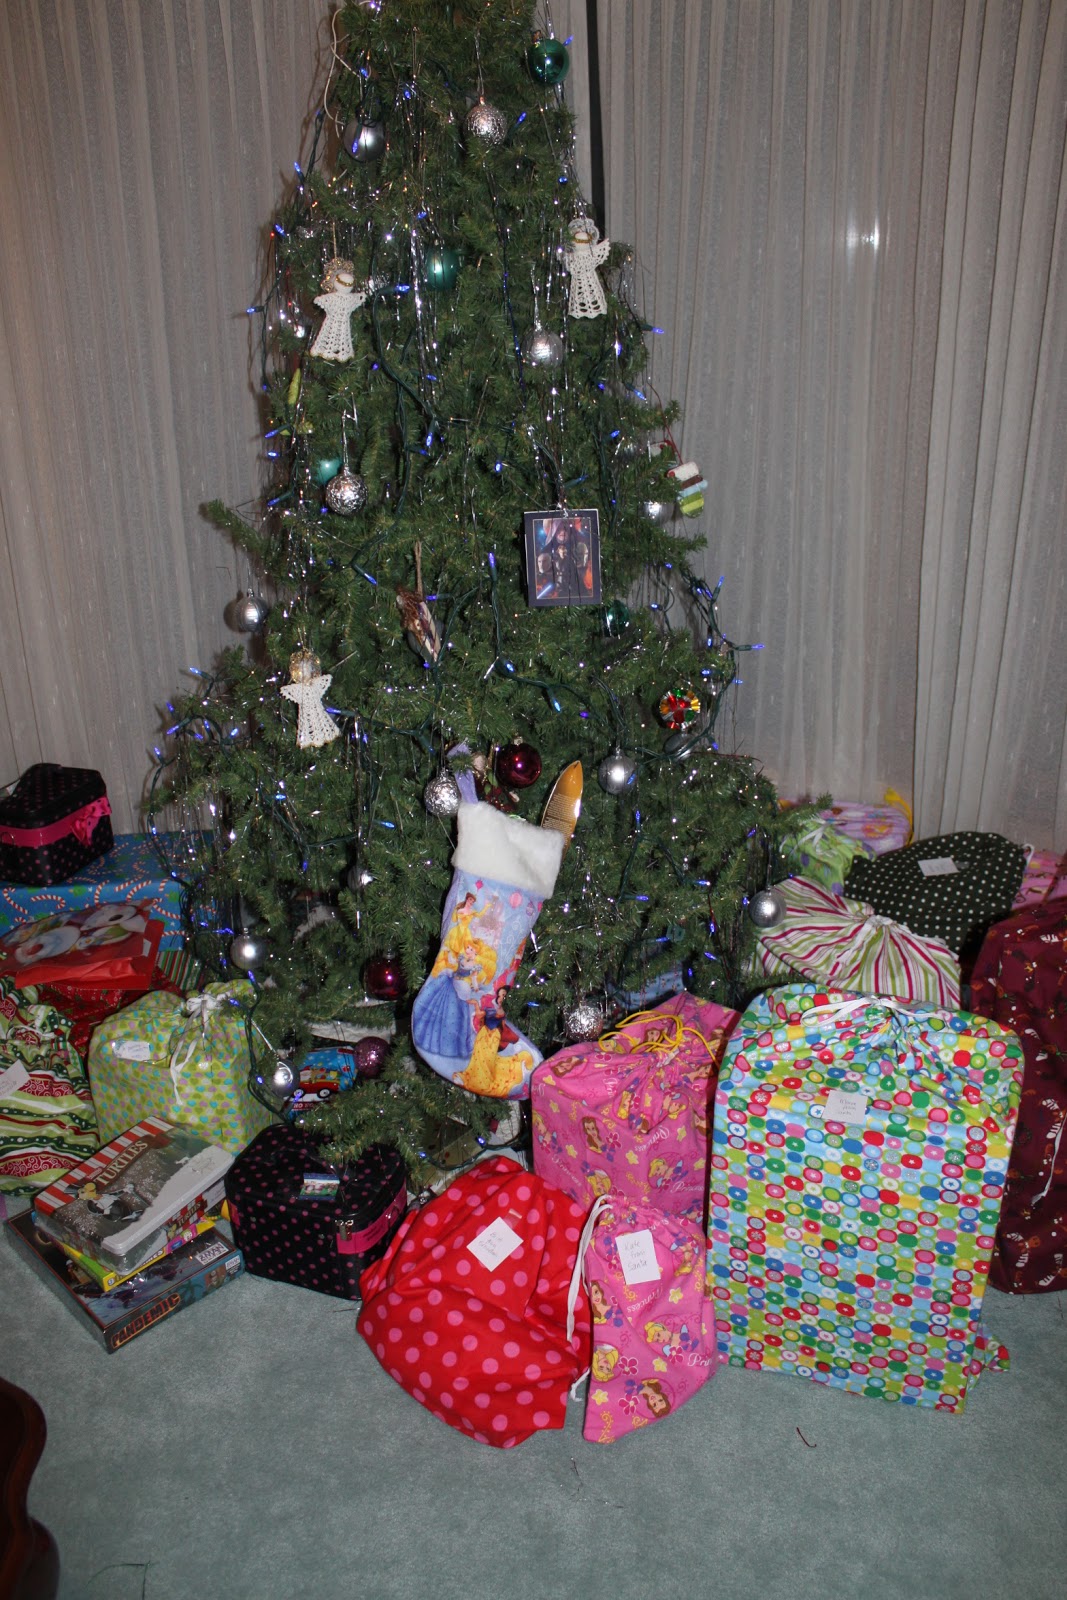
And a quick peek at our Christmas morning at Grandma's house:
Twas no less exciting with fabric!!
All for now!
Monday, December 19, 2011
Its Raining Homemade Flannel Reusable Gift Bags
Alleluia!
In early December a very talented friend and busy mom of four was excited about the flannel gift bags she was sewing in lieu of using wrapping paper at Christmas. At first I thought, nah. I'd seen such drawstring bags before and didn't think they were very pretty. Plus, what kids don't LOVE to rip open the paper on Christmas morning? Isn't it exciting???
Well, I rethought the whole gift bag idea. The more I thought about it, the more I warmed up to it! After all, there is some very lovely flannel to be had these days. So, aside from the obvious benefit to the environment, here are my top four reasons to begin the switch to fabric gift bags:
1. Kids may love to rip open paper in a frenzy. But I hate wrapping gifts in a frenzy the night before Christmas, and I hate gathering the paper up into huge garbage bags the next morning. What a mess and what a waste. The kids will have to get over it. Already, my littles are playing with the bags, oohing and aahhing over the fabrics and colors, so I don't think this will be a hard sell.
2.You can pick your fabrics, colors and themes and have lots of fun with it. I am always inspired by children's stores, especially Gymboree, and I noticed this winter their display theme was cotton candy pinks, reds, bright greens and whites - a combination that was striking. I had that in mind when I picked my fabrics. The colors make me happy! You don't have to stick with Christmas fabrics either. I bought princesses, monkeys, polka-dots and hearts. Maybe I'll add a few new ones each year. And I think we'll leave a few special bags out on Christmas Eve for Santa to fill. Fun!!
3. The bags are multi-functional. They need not be used only at Christmas, especially if you have some cheery non-Christmas fabric. They can be a bookbag in a pinch. Or a little bag to throw shoes in. Or coloring books for the road trip. Multi-functional!!!
4. In using the SAME bags year after year, many years down the road my kids will look fondly on the well-worn bags and just ... remember.
oh, here's the princess bag, remember that Belle costume Santa brought the year I was six? oh ya and this is the reindeer bag Mom always used to put my Lego in! hey, look at this striped one with the rip, that was the year I kept tugging on the drawstring! this bag was my favorite ... you get the idea. This reason won me over.
I have made about thirty bags, of all different sizes based on the gifts I have purchased or typically purchase. The largest is the size of a king-size pillowcase, and the smallest is just perfect for a diamond ring LOL!! And in case you are inspired to do the same, I have created a little tutorial so you can get busy as well. Might be too late for this year, but when all that fabric comes on sale in January, away you go!
Reusable Gift Bag Tutorial
Purchase your fabric. I bought 1 meter cuts, thinking I'd make one larger and one smaller bag, but you decide what sizes you will use most. I prefer flannel because its more substantial than cotton and less see-through.
Step 1: Cutting
Fold your fabric in half so the selvages meet. The fold will become one long side of your rectangular bag.
Cut across the fabric, from fold to selvages, this will be the top, draw-string edge. Measure down from this cut edge the length you want your bag to be, and cut. This is the bottom edge of your bag. This process goes very quickly with a rotary cutter, ruler and large cutting mat. Buy them when they are half-price at Fabricland, and buy the largest mat you can afford. If you don't have these, you can use a yardstick to mark a line across, then cut with a good pair of scissors.
Your cut bag should look something like this, with the fold on the left. It looks like a nice little sleeping bag:
Step 2: Making the Casing
The casing will encase the drawstring. We are going to fold the top edge down about 1 inch and sew it, to create a little tube for that drawstring to go through. But first, you need to "finish" the raw top edge to avoid fraying. There are a few ways - you can serge or zigzag the top edge. You can fold the edge over 1/4 inch, press, then fold over 1 inch and sew down. Or, you can do what I did - pink it. It was just what I felt like doing at the time, and a pinked edge will resist fraying. So finish that top edge, and fold it over 1 inch. Press well.
Step 3: Sewing the side and bottom edges.
Fold it back into the sleeping bag, right sides together.
But we don't want to sew our casing shut! Begin sewing just below the casing opening, shown here. Use whatever seam allowance you are comfortable with. Garments are usually 5/8", but for crafts we generally use a little less. I go about 3/8" from the edge.
Make sure to backstitch several stitches to secure this spot. It will receive a lot of wear and tear!
When you get almost to the turning point on the bottom, keep the needle down but lift the presser foot up and pivot 45 degrees, take 2 stitches back and forth, pivot again and now you should be sewing parallel with the bottom edge. I do this corner angle because it makes a much nicer corner when you turn it right side out. Also, I usually do lots of backstitching at the corner to make sure it stays strong :)
At this point, its nice to finish the raw edges. It will strengthen the seam by providing another row of stitching, and minimizes little threads fraying and escaping. I have used my serger, but you can also just zigzag close to the stitching.
Step 4: Turn Right Side Out
Give it a good press. It should look something like this:
Step 5: Drawstring
You can use actual drawstring, ribbon, yarn, whatever. Use something strong and preferably, on sale. Cut a piece of drawstring the perimeter of the bag, plus about 12 inches (6 inches to hang out on each end).
Use a large safety pin and attach to the end of the drawstring. Snake it through!
Voila!!
If you are making lots, create an assembly line. Have lots of fun! I sure did!
God bless your last week before Christmas!
In early December a very talented friend and busy mom of four was excited about the flannel gift bags she was sewing in lieu of using wrapping paper at Christmas. At first I thought, nah. I'd seen such drawstring bags before and didn't think they were very pretty. Plus, what kids don't LOVE to rip open the paper on Christmas morning? Isn't it exciting???
Well, I rethought the whole gift bag idea. The more I thought about it, the more I warmed up to it! After all, there is some very lovely flannel to be had these days. So, aside from the obvious benefit to the environment, here are my top four reasons to begin the switch to fabric gift bags:
1. Kids may love to rip open paper in a frenzy. But I hate wrapping gifts in a frenzy the night before Christmas, and I hate gathering the paper up into huge garbage bags the next morning. What a mess and what a waste. The kids will have to get over it. Already, my littles are playing with the bags, oohing and aahhing over the fabrics and colors, so I don't think this will be a hard sell.
2.You can pick your fabrics, colors and themes and have lots of fun with it. I am always inspired by children's stores, especially Gymboree, and I noticed this winter their display theme was cotton candy pinks, reds, bright greens and whites - a combination that was striking. I had that in mind when I picked my fabrics. The colors make me happy! You don't have to stick with Christmas fabrics either. I bought princesses, monkeys, polka-dots and hearts. Maybe I'll add a few new ones each year. And I think we'll leave a few special bags out on Christmas Eve for Santa to fill. Fun!!
3. The bags are multi-functional. They need not be used only at Christmas, especially if you have some cheery non-Christmas fabric. They can be a bookbag in a pinch. Or a little bag to throw shoes in. Or coloring books for the road trip. Multi-functional!!!
4. In using the SAME bags year after year, many years down the road my kids will look fondly on the well-worn bags and just ... remember.
oh, here's the princess bag, remember that Belle costume Santa brought the year I was six? oh ya and this is the reindeer bag Mom always used to put my Lego in! hey, look at this striped one with the rip, that was the year I kept tugging on the drawstring! this bag was my favorite ... you get the idea. This reason won me over.
I have made about thirty bags, of all different sizes based on the gifts I have purchased or typically purchase. The largest is the size of a king-size pillowcase, and the smallest is just perfect for a diamond ring LOL!! And in case you are inspired to do the same, I have created a little tutorial so you can get busy as well. Might be too late for this year, but when all that fabric comes on sale in January, away you go!
Reusable Gift Bag Tutorial
Purchase your fabric. I bought 1 meter cuts, thinking I'd make one larger and one smaller bag, but you decide what sizes you will use most. I prefer flannel because its more substantial than cotton and less see-through.
Step 1: Cutting
Cut across the fabric, from fold to selvages, this will be the top, draw-string edge. Measure down from this cut edge the length you want your bag to be, and cut. This is the bottom edge of your bag. This process goes very quickly with a rotary cutter, ruler and large cutting mat. Buy them when they are half-price at Fabricland, and buy the largest mat you can afford. If you don't have these, you can use a yardstick to mark a line across, then cut with a good pair of scissors.
Your cut bag should look something like this, with the fold on the left. It looks like a nice little sleeping bag:
Step 2: Making the Casing
The casing will encase the drawstring. We are going to fold the top edge down about 1 inch and sew it, to create a little tube for that drawstring to go through. But first, you need to "finish" the raw top edge to avoid fraying. There are a few ways - you can serge or zigzag the top edge. You can fold the edge over 1/4 inch, press, then fold over 1 inch and sew down. Or, you can do what I did - pink it. It was just what I felt like doing at the time, and a pinked edge will resist fraying. So finish that top edge, and fold it over 1 inch. Press well.
While you are at it, you need to finish the side edges of the casing - the drawstrings will come out of these edges so they need to be fray-proof. Again, I pinked!
Now sew the top edge in place, along the pinking. I used a narrow zig-zag because its a little bit stronger than a straight stitch. And looks a bit prettier :) Give it a good press. By the way, use a neutral thread, like a cream or a gray. This will work for all fabrics and you don't want to be changing thread for every bag.
Step 3: Sewing the side and bottom edges.
Fold it back into the sleeping bag, right sides together.
But we don't want to sew our casing shut! Begin sewing just below the casing opening, shown here. Use whatever seam allowance you are comfortable with. Garments are usually 5/8", but for crafts we generally use a little less. I go about 3/8" from the edge.
Make sure to backstitch several stitches to secure this spot. It will receive a lot of wear and tear!
When you get almost to the turning point on the bottom, keep the needle down but lift the presser foot up and pivot 45 degrees, take 2 stitches back and forth, pivot again and now you should be sewing parallel with the bottom edge. I do this corner angle because it makes a much nicer corner when you turn it right side out. Also, I usually do lots of backstitching at the corner to make sure it stays strong :)
At this point, its nice to finish the raw edges. It will strengthen the seam by providing another row of stitching, and minimizes little threads fraying and escaping. I have used my serger, but you can also just zigzag close to the stitching.
Now clip the corner so it turns right-side-out easier. (Only clip this corner, not the corner on the folded edge)
Step 4: Turn Right Side Out
Give it a good press. It should look something like this:
Step 5: Drawstring
You can use actual drawstring, ribbon, yarn, whatever. Use something strong and preferably, on sale. Cut a piece of drawstring the perimeter of the bag, plus about 12 inches (6 inches to hang out on each end).
Use a large safety pin and attach to the end of the drawstring. Snake it through!
Voila!!
If you are making lots, create an assembly line. Have lots of fun! I sure did!
God bless your last week before Christmas!
Subscribe to:
Posts (Atom)